SSL 보안 서버 인증

결제 안내 보러 가기신용카드 결제, 무통장 입금 안내
고객 센터
1544-4755 내선 번호 : 4

인증서 발급 안내
평일 09:00 ~ 18:00

업무 시간 내에만 처리 가능하며 토/일요일, 공휴일에는 발급 업무가 제한됩니다.


보안 서버 환불 정책
SSL 보안 서버 인증서 구매 후 인증서의 오류로 인해 서버 내에 적용이 불가능 할 경우 1개월 이내 전액 환불해 드립니다.
(단, 개인키 분실, 도메인 변경 및 고객의 변심으로 인한 환불 요청은 제외)

SSL 보안 서버 인증

가장 합리적인 가격의 Sectigo SSL 인증을 통해 귀사의 웹서버에 접속하는 회원들의 개인 정보를 안전하게 보호해 주시기 바랍니다.

Plesk Server Administrator : CSR 생성 및 SSL 인증서 적용

본 가이드는 인증서 파일 설정시 참고 예제이며, 고객사 서버에 SSL 설치/적용 성공을 보증하지 않습니다
설정 과정에서 발생하는 다양한 문제에 대한 해결은 보증 대상이 아닙니다 (인증서 자체 오류시 무제한 재발급)
웹서버 자체 설정/작동 관련 사항은 웹서버 매뉴얼 또는 공급사 기술지원을 이용하시기 바랍니다
Plesk Server Administrator

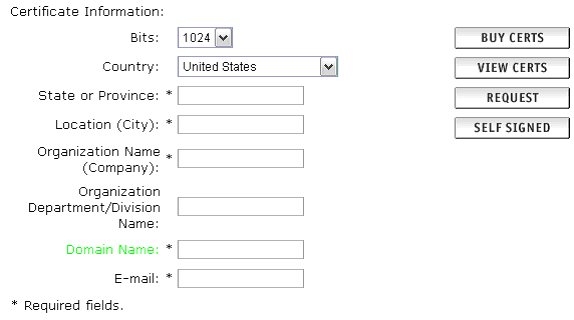
Generating a Certificate Signing Request (CSR) using Plesk Server Administrator

A CSR is a file containing your certificate application information, including your Public Key. Generate your CSR and then copy and paste the CSR file into the webform in the enrollment process.

Important Notes on Certificates In order to use SSL certificates for a given domain, the domain MUST be set-up for IP-Based hosting. If the given domain has the www prefix enabled, you must set-up your CSR with the www prefix included. If you do not, you will receive a warning message when trying to access the domain with the www prefix.

All certificates are located in the ../vhosts/'domain name'/cert/httpsd.pem file. Where this directory reads "domain name", you must enter the domain name for which the certificate was created. Access the domain management function by clicking on the Domains button at the top of the PSA interface. The Domain List page appears.

Click the domain name that you want to secure with SSL. The Domain Administration page then appears. If you have an IP based hosting account with SSL support, the Certificate button will be enabled. If you have a name based hosting account the Certificate button will be greyed out. You must have an IP based hosting account to continue. Click the Certificate button. The SSL certificate setup page appears. The Certificate Information: section lists asks for a number of fields to be completed to generate your CSR.

Creating your CSR

The Bits selection allows you to choose the level of encryption of your SSL certificate. Select the appropriate number from the drop down box next to Bits. Enter your details into the State or Province, Locality, Organization Name and Organization Unit Name fields.
Enter your domain name into the Domain Name: field.
Click on the Request button.
Plesk will now email your CSR to the email address provided when you signed up. You will see that the email contains two sections - the RSA Private Key and the Certificate Signing Request. Do not lose your RSA Private Key, you will need this later.
Click Up Level to return to the Domain Administration page.


Plesk Server Administrator 6

Plesk Server Administrator 6 CSR Creation Generating a Certificate Signing Request

To generate a certificate signing request (CSR) follow these steps:

  1. At the Certificate repository page, click on the ADD button. The certificate creation page will open.
  2. Specify the certificate name.
  3. The Bits selection allows you to choose the level of encryption of your SSL certificate. Select the appropriate number from the drop-down list.
  4. Select a country from the drop-down list
  5. Specify the state or province, location (city).
  6. Enter the appropriate organization name and department/division in the field provided.
  7. Enter the Domain Name for which you wish to generate the certificate signing request.
  8. Click the REQUEST button. A certificate signing request will be generated and added to the repository. You will be able to add the other certificate parts later on.

Note: Do not lose your RSA Private Key, you will need this later.

Generating a CSR using an existing private key

In some cases you have a certificate in the repository, which has only the private key part and the other parts are missing due to some reasons. To generate a new Certificate Signing Request using the existing private key, follow these steps:

  1. At the certificate repository page, select from the list a certificate, which has the private key part only. You will be taken to the SSL certificate properties page.
  2. Click REQUEST.


Plesk Server Administrator 7

Plesk Server Administrator 7 CSR Creation
  1. Login to the Plesk 7 Control Panel.
  2. From the left hand menu, select 'Domains'.
  3. Click on the domain name that you wish to generate the CSR for.
  4. Click on the 'Certificates' menu item.
  5. Click on the 'Add New Certificate' item.
  6. Fill out the information on the page. All items noted by red asterisks must be filled in
  7. Press the 'Request' button.
  8. You will then be returned to the Certificates menu. From the list at the bottom of the page, click on the certificate name that you just created. Mid-way down the page, there is a box. Copy the content of this box labelled 'CSR'. It should look similar to the example below:

    -----BEGIN CERTIFICATE REQUEST-----
    MIIBSzCB9gIBADCBkDELMAkGA1UEBhMCVVMxDjAMBgNVBAgTBVRleGFzMQ4wDAYD
    ....
    HNX2uFXghrjBJw3mtZ36JhG7cLeWZK7B+4dmOL4f2ToreSW946wQMxK5ZYYOK68=
    -----END CERTIFICATE REQUEST-----

  9. Paste the CSR into the order screen when purchasing an SSL certificate.

출처: COMODO http://ssl.comodo.com/